2015年6月23日 星期二

網樂通安裝shairport

0. 更新source.list (etc/apt/source.list)
#/etc/apt/sources.list

deb [arch=all] http://debian.csie.nctu.edu.tw/debian/ wheezy main contrib non-free
deb-src http://debian.csie.nctu.edu.tw/debian/ wheezy main contrib non-free

deb [arch=all] http://debian.csie.ntu.edu.tw/debian/ wheezy main contrib non-free
deb-src http://debian.csie.ntu.edu.tw/debian/ wheezy main contrib non-free

deb [arch=sh4] http://download.si-linux.co.jp/debian-sh/wheezy-sh4/ wheezy main contrib non-free
deb-src http://download.si-linux.co.jp/debian-sh/wheezy-sh4/ wheezy main contrib non-free

deb http://ftp.yzu.edu.tw/Linux/debian-sh4-for-nextvod/ wheezy all


1. wget http://shana1997o.myweb.hinet.net/wheezy-sh4/kernel_modules-stmfb-1003.tgz

2. tar -xvzf kernel_modules-stmfb-1003.tgz

3. cd kernel_modules-stmfb/

4. mkdir /lib/modules

5. tar -xvzf 2.6.32.59_stm24_0211-PDK7105-32BITS.tgz -C /lib/modules

6. cd ~

7. mkdir /mnt/sda1

8.mount /dev/sda1 /mnt/sda1

9. cp /root/kernel_modules-stmfb/vmlinux.ub /mnt/sda1

10.depmod -a 之後, 在 /etc/modules 裡加入:
stmfb display0=640x480-16@60:3M:0:PAL:RGB
stm_v4l2
stmcore-display-sti7105 hdmi0=enable
stmvbi
stmvout

11. reboot (重開機之後, 再ssh 登入)

12. apt-get update 

如果出現 "no public key available"的話就
apt-get install debian-keyring debian-archive-keyring ,並重新

apt-get update 


13.apt-get install alsa-utils
14. aplay -l (看是否有抓到音效卡)
root@debian-wheezy-sh4:~# aplay -l
**** List of PLAYBACK Hardware Devices ****
card 0: STx7105 [STx7105 audio subsystem], device 0: [PCM player #0 (HDMI)]
Subdevices: 1/1
Subdevice #0: subdevice #0
card 0: STx7105 [STx7105 audio subsystem], device 1: [PCM player #1]
Subdevices: 1/1
Subdevice #0: subdevice #0
card 0: STx7105 [STx7105 audio subsystem], device 2: [SPDIF player (HDMI)]
Subdevices: 1/1
Subdevice #0: subdevice #0
來說就是hw:card,device)

15. 確定輸出沒問題的話, 就可以設定default輸出
a. 在/etc/asound.conf (不存在的話, 就自己建), 輸入以下內容:
pcm.!default {
type hw
card 0
device 1
}

b. /etc/init.d/alsa-utils restart

16.apt-get install build-essential libssl-dev libcrypt-openssl-rsa-perl libao-dev libio-socket-inet6-perl libwww-perl avahi-utils pkg-config git chkconfig libssl-dev libavahi-client-dev libasound2-dev

17.
git clone -b 1.0-dev git://github.com/abrasive/shairport.git
cd shairport
./configure
make
make install

18.測試
shairport -a "wheezy-sh4" 

19. 開機自動啟動
a. cd /etc/init.d
    wget http://img.samantw.com/debian-sh4/shairport 
    chmod +x shairport

b.touch /root/shairport-watchdog.sh 之後在shairport-watchdog.sh加入以下內容:

# find service pids
pgrep shairport

#if we get no pids, service is not running

if [ $? -ne 0 ]

then
  server avahi-daemon restart
  service shairport start
  echo "shairport started or restarted."
fi
c. 在/etc/crontab 裡面加入
* * * * * root /bin/sh /root/shairport-watchdog.sh > /dev/null

2015年6月21日 星期日

Raspberry pi 當NAS(OpenMediaVault)

Raspberry Pi改裝成為NAS的功能,步驟請參考:

1.下載Image檔 link (記得選擇你的Raspberry Pi版本)

2. 燒錄進去,並開機,會秀出Raspberry pi IP位址。

3. 用同區網內的電腦打開瀏覽器打上IP位址即可登錄,並做相關設定。

    webUI預設帳密: admin/openmediavault  , 本機預設帳密: root/openmediavault

4.更新套件資源更新列表 Link

5. 可以安裝其他套件
   (如 shairport ,安裝完後,因為Raspberry pi音源預設是HDMI out , 需下指令 sudo rasp-config 去做更改設定,也可以用alsamixer改變音量大小。

6.Enjoy it。

讓Raspberry pi 具備airplay功能(安裝shairport)

Raspberry pi裝shairport套件後,也讓它能擁有如Airplay的功能,只要用apple設備都能透過網路串流,讓Raspberry pi發出聲音。

安裝方式請參考下列連結,謝謝!

http://drewlustro.com/hi-fi-audio-via-airplay-on-raspberry-pi/


控制音量大小的指令: alsamixer

2015年6月14日 星期日

[網樂通]系統備份

系統備份

網樂通在更新套件時,都要很久一段時間,所以想要學著怎麼打包成.tgz,參考網路文章,寫下此記錄備忘。

[init]
先裝隨身碟,再用utools進去系統做以下操作。

[STEP1]
root@sh4twbox~# mkdir USB #建立名為USB的資料夾 
root@sh4twbox~# mount /dev/sdb1 /root/USB #將隨身碟掛載到USB資料夾
[STEP2]
root@sh4twbox~# mkdir /mnt_system #如果/mnt_system存在可以略過這個步驟 
root@sh4twbox~# mount /dev/sda2 /mnt_system
root@sh4twbox:/mnt_system# rm -rf etc/udev/rules.d/70-persistent-net.rules 
#刪除此檔以免mac位址不同導致網路無法使用
[STEP3]
root@sh4twbox~# mkdir sda1 #建立sda1資料夾 
root@sh4twbox~# mount /dev/sda1 /root/sda1 #掛載 
root@sh4twbox~# cp /root/sda1/* /mnt_system/boot/ #複製kernel以及uboot.sh至/mnt_system/boot/ root@sh4twbox~# cd /mnt_system 
root@sh4twbox:/mnt_system# cd ~ 
root@sh4twbox~# tar cvzf /root/USB/target.tgz /mnt_system 
#將/mnt_system打包成target.tgz後儲存於外接USB,因為網樂通CPU不夠力所以可能要等上30分鐘
[FINAL]
root@sh4twbox~# sync #確保資料寫入磁碟 root@sh4twbox~# powerpff #關機

2015年6月11日 星期四

Raspberry Pi套件安裝

Raspberry pi最近很火紅,安裝過程就不敘述了,底下是自己在裝系統時會裝的套件。記錄的目的是怕自己忘了!!XD

1.安裝輸入法

sudo apt-get install gcin


2.安裝多媒體(GUI)

sudo apt-get install smplayer

sudo apt-get install vlc

sudo apt-get install lxmusic

3.遠端控制

遠端控制可以用SSH或VNC或XRDP,因為我的主力是WINDOWNS,所以選擇了XRDP

sudo apt-get install xrdp

4.網路相關套件

PCMAN(BBS必備)
sudo apt-get install pcmanx-gtk2

LINUX的Firefox
sudo apt-get install iceweasel

ssh連線軟體
sudo apt-get install putty

5.文書相關

編輯器
sudo apt-get install emacs

Linux界的Office
sudo apt-get instal libreoffice

截圖軟體
sudo apt-get install shutter

6.其他

Arduino IDE
sudo apt-get install arduino

電路繪圖軟體
sudo apt-get install fritizing

7.BT Download
以下二個都是Linux著名的BT下載軟體,安裝完後還要去做細部設份(煩請Google網路教學)
sudo apt-apt install transmission-daemon
sudo apt-apt install aria2


以上是我常用的套件,其他的相關套件可以上網去找找。
(可以 Google "Raspberry Pi:Raspbian套件列表"  葉難大大寫得很詳細)


2015年6月9日 星期二

藍芽遙控車 Arduino實作

  兒子遙控車的遙控器不見了,剛好最近在研究Arduino ,所以就來實作一下,如何將現有的車子改裝,用Arduino來控制,並由Ardroid手機來操作。

一、拆設備

其實內裝就一個有無線裝置的IC板,去控制二顆直流馬達的前進/後退,左轉/右轉。就把它拆了。


二、建置Arduino

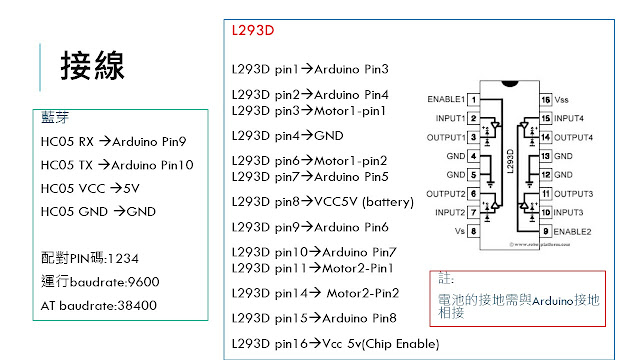
Arduino只是一個微電腦控制器,為了控制2顆直流馬達,因此需要 IC L293D,無線傳輸的部份我選擇了藍芽模組HC05

接線:

接線接完後就要寫Artduino程式,透過程式來控制馬達的作動。

三、通訊協定(Protocol)

預期想法是如此,手機會經由藍芽發出一些字串,讓車子能透過這些字串來作動。

因為通訊協定是這樣

起始字元  控制碼 結束字元

起始字元
0: stop car
1: 讀取控制碼

控制碼
3:前進
4:後退
5:左轉
6:右轉

結束字元 e


因此彷照上述協定,所撰寫的程式如下:


#include <SoftwareSerial.h>
SoftwareSerial BT(10, 9); // BT TX->D10 , BT RX->D9
const byte ledPin = 13;
char val;     // 儲存接收資料的變數

const int motor1a = 4;
const int motor2a = 5;
const int EA = 3;

const int EB = 6;
const int motor3a = 7;
const int motor4a = 8;
const byte speed=150;

int mode;
char totalcommand[16];
int state;
int index;

void setup()
{
  pinMode(ledPin, OUTPUT);
  Serial.begin(9600);
  BT.begin(9600);
  // 藍牙連線成功後,發佈「準備好了」訊息。
  BT.println("BT is ready!");

  pinMode(motor1a,OUTPUT);
  pinMode(motor2a,OUTPUT);
  pinMode(EA,OUTPUT);
  pinMode(motor3a,OUTPUT);
  pinMode(motor4a,OUTPUT);
  pinMode(EB,OUTPUT);


}

void loop()
{
   if(BT.available() )
   {
     val = BT.read();
   
     switch(state)
     {
      case 0:
              if(val=='0')
              {
               analogWrite(EA,0);
               analogWrite(EB,0);              
               Serial.println("stop car");
              }
              else if(val=='1')
              {
               analogWrite(EA,0);
               Serial.println("stop carX");
              }
              else if(val=='2')
              {
               analogWrite(EB,0);
               Serial.println("stop carY");
              }
              else if(val=='3') //forward
              {
                state=1;
                mode=3;
                index=0;
                for( int i = 0; i < sizeof(tcmd);  ++i )
                {
                  tcmd[i] = (char)0;
                }
              }
              else if(val=='4')//back
              {
                state=1;
                mode=4;
                index=0;
                for( int i = 0; i < sizeof(tcmd);  ++i )
                {
                  tcmd[i] = (char)0;
                }
             
              }
              else if(val=='5')//left
              {
                state=1;
                mode=5;
                index=0;
                for( int i = 0; i < sizeof(tcmd);  ++i )
                {
                  tcmd[i] = (char)0;
                }
             
              }
              else if(val=='6')//right
              {
                state=1;
                mode=6;
                index=0;
                for( int i = 0; i < sizeof(tcmd);  ++i )
                {
                  tcmd[i] = (char)0;
                }
             
              }
   
      break;
      case 1:

              if(val=='e')
              {
                switch(mode)
                 {
                  case 3:
                         Serial.println("foward");
                         analogWrite(EB,speed);
                         digitalWrite(motor3a,LOW);
                        digitalWrite(motor4a,HIGH);
               
                  break;
                  case 4:
                         Serial.println("Back");
                         analogWrite(EB,speed);
                         digitalWrite(motor3a,HIGH);
                        digitalWrite(motor4a,LOW);
               
                  break;
                  case 5:
                         Serial.println("left");
                       analogWrite(EA,speed);
                       digitalWrite(motor1a,LOW);
                       digitalWrite(motor2a,HIGH);
               
                  break;
                  case 6:
                         Serial.println("right");
                     analogWrite(EA,speed);
                     digitalWrite(motor1a,HIGH);
                     digitalWrite(motor2a,LOW);
               
                  break;
             
                 }
                state=0;
                mode=0;
              }
              else
              {
                tcmd[index]=val;
                index++;
              }

      break;
     }
   }
}

四、當我用Arduino UNO作完實驗後,確定可行後,就銲電路,並使用Arduino pro板,用雙面膠裝在車上。


試跑後,發現3顆AA電池跑不動,故改裝用行動電源來控制。Pretty Good。


五、硬體完成後,開始要寫Android App,使用的開發環境是App Inventor 2。參考網路用APP Inventro藍芽溝通教學後,立馬自已寫一個。


這在裡推薦一下,MIT AI2 Companion這個APP,當電腦開發完,只要你手機路電腦網路有連結,它會直接將最後更改完的結果傳送到您的手機,方便你測試。

六、完成囉! Enjoy it !!

  我兒子很愛。


2015年5月25日 星期一

網樂通[wheezy] 建立samba

1.更新source.list , /etc/apt/source.list link

#/etc/apt/sources.list
deb [arch=all] http://debian.csie.nctu.edu.tw/debian/ wheezy main contrib non-free
deb-src http://debian.csie.nctu.edu.tw/debian/ wheezy main contrib non-free

deb [arch=all] http://debian.csie.ntu.edu.tw/debian/ wheezy main contrib non-free
deb-src http://debian.csie.ntu.edu.tw/debian/ wheezy main contrib non-free

deb [arch=sh4] http://download.si-linux.co.jp/debian-sh/wheezy-sh4/ wheezy main contrib non-free
deb-src http://download.si-linux.co.jp/debian-sh/wheezy-sh4/ wheezy main contrib non-free

deb http://ftp.yzu.edu.tw/Linux/debian-sh4-for-nextvod/ wheezy all


2.apt-get update

3.apt-get upgrade

4.裝入隨身碟

5.nano /etc/samba/smb.conf

6.移到最下面,新增以下文字

[wheezy]
path = /media/sdb1
public = yes
writable = yes
guest ok = yes
guest account = root
force user = root

7.service samba restart

8.enjoy it

註: 以上方式沒有設密碼,一般使用者皆可登入,使用上要小心。


2015年5月1日 星期五

網樂通安裝Aria2

1. 更新套件庫來源網址
nano /etc/apt/sources.list
將內容改成下列
deb [arch=all] http://free.nchc.org.tw/debian/ wheezy main contrib non-free
deb http://download.si-linux.co.jp/debian-sh/wheezy-sh4/ wheezy main contrib non-free

deb http://ftp.yzu.edu.tw/Linux/debian-sh4-for-nextvod/ wheezy all
deb [arch=all] http://free.nchc.org.tw/debian-security/ wheezy/updates main contrib non-free
2. 更新套件庫
apt-get update
3. 安裝Aria2
apt-get install aria2

4.並建立設定檔conf  ,參考1 參考2
mkdir /etc/aria2
nano /etc/aria2/aria2.conf

將下列內容貼上
enable-rpc=true
#允许所有来源, web界面跨域权限需要
rpc-allow-origin-all=true
#允许非外部访问
rpc-listen-all=true
#RPC端口, 仅当默认端口被占用时修改
#rpc-listen-port=6800

#文件保存路径
dir=/media/sdb1
#文件缓存, 使用内置的文件缓存, 如果你不相信Linux内核文件缓存和磁盘内置缓存时使用, 需要1.16及以上版本
#disk-cache=0
#另一种Linux文件缓存方式, 使用前确保您使用的内核支持此选项, 需要1.15及以上版本(?)
#enable-mmap=true
#文件预分配, 能有效降低文件碎片, 提高磁盘性能. 缺点是预分配时间较长
#所需时间 none < falloc ? trunc << prealloc, falloc和trunc需要文件系统和内核支持
file-allocation=prealloc
#启用本地节点查找
bt-enable-lpd=true
#添加额外的tracker
#bt-tracker=<URI>,…
#单种子最大连接数
#bt-max-peers=55
#强制加密, 防迅雷必备
#bt-require-crypto=true
#当下载的文件是一个种子(以.torrent结尾)时, 自动下载BT
follow-torrent=true
#BT监听端口, 当端口屏蔽时使用
#listen-port=6881-6999
5.設定開機啟動
nano /etc/rc.local
/usr/bin/aria2c --conf-path=/etc/aria2/aria2.conf

存檔後裝上隨身碟,重開機,Enjoy it!!

Other